

Concrete Pouring Tips,Tools, and Timing You Need
You stand in the yard with a plan in your head and tape on your belt. You can already see the patio where the family sits and the driveway that finally stays clean. The idea feels clear, but the process can still feel tricky. Should you pour the concrete yourself or call a crew? What does smart concrete pouring look like from start to finish? How do you avoid cracks, dusting, and slippery surfaces? This guide walks you through the steps to pouring concrete in a real job order so you can make steady progress.
Learn More: Can You Pour Concrete in the Rain?
Prep that protects the slab
- Build straight, tight forms at the right height.
- Compact a flat, well-drained base.
- Support mesh or rebar on chairs to prevent steel from being pulled out of the slab.
- Plan control joints now. Mark them on the forms so cutting is fast later.
- Stage tools in the order you will use them.
Good prep makes concrete slab pouring calm and repeatable.
Tools you will actually use
Layout and forms
String line, level, tape, form boards, stakes, and screws.
Placement and leveling
Shovels, a come along rake, wheelbarrows or buggy, a straight screed board, a bull float with handles.
Finishing and joints
Magnesium hand floats, a steel trowel for interiors, a broom for outdoor grip, an edger and groover if you want hand-toolled joints, and a saw for control joints.
Curing and protection
Curing compound or plastic with wet burlap, insulating blankets if it is cold, and cones or tape to keep traffic off.
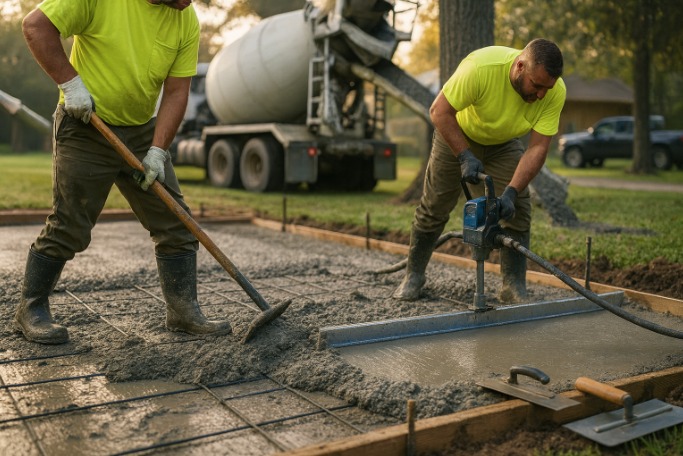
Steps to pouring concrete in a real job order
Place
Start from the low side and pour in steady lifts. Pull mix into corners. Do not drop concrete from a height that separates stone from paste.
Screed
Rest the board on the forms. Use a slow sawing motion. Fill low spots before moving on.
Bull float
Float right after screeding. Knock down ridges and embed stone.
Wait for bleed water to leave
Do not finish while the surface is shiny. The sheen must fade first.
Finish
Broom exterior slabs for safe traction. Use a steel trowel indoors when you want a smooth look.
Cut control joints
Cut early and deep enough. Keep panels square or close to square. Good joints reduce random cracking.
Cure
Start curing as soon as finishing allows. Keep moisture in for several days. Protect the surface from sun, wind, and feet.
Pouring concrete steps without stress
- Build solid riser and tread forms and brace well.
- Place in lifts so you do not trap voids. Tap or rod the sides to release air.
- Light float, then edge the treads.
- Broom across each tread for grip.
- Cure steps the same way as a slab.
Mix, moisture, and strength
Choose a workable mix that moves without turning soupy. Ask for a plasticiser if you want more flow without extra water. Avoid adding hose water on site. Balanced slump plus patient curing gives a strong surface. These habits matter for every concrete pouring job.
Dry concrete pour explained
A dry concrete pour means placing dry bagged mix and then spraying it with water. People use it for speed on small patch work, but it’s unreliable for slabs and steps. You can’t control the water content or the quality of mixing, which leads to weak spots and surface failures. If you’re wondering how to dry pour concrete, the honest advice for structural work is: don’t. Use a mixer or order ready-mix so you stay in control. A dry pour concrete calculator won’t solve the core issue of uneven water and poor mixing. Instead, use a standard volume calculator for properly mixed concrete.
Pouring concrete in cold weather
Cold slows hydration and can damage fresh slabs. Plan ahead.
- Keep the subgrade and materials above freezing.
- Use warm mix water if needed and a suitable accelerator.
- After finishing, cover with insulating blankets or create a simple enclosure.
- Protect the slab at least the first full day and longer if it stays very cold.
These steps make pouring concrete in cold weather predictable and safe.
Finishes that work
- Broom finish for patios, paths, and driveways. Choose a light or medium texture.
- Smooth trowel for interior rooms that need a tight surface.
- Edges and borders can be hand-toolled for cleaner lines and chip resistance.
Let the slab cure and dry before sealing. Rushing sealers can trap moisture.
Troubleshooting quick help
- Random cracks mean joints were late, shallow, or spaced too far. Cut sooner and keep panels square.
- Dusting or scaling often means finishing happened over bleed water or the slab got too cold. Wait out the sheen and protect in cold weather.
- Surface too slick outdoors means you missed the broom window. Broom when the slab holds light foot traffic without tearing.
- Curling comes from the surface drying faster than the base. Improve curing and review joint spacing.
Cost of pouring a concrete slab
The cost of pouring a concrete slab changes with area and thickness, access, reinforcement, finish type, number of joints, and any weather protection like blankets or enclosures. Ask for itemised quotes. Keep mix strength and finish clear so you can compare like for like.
FAQs
Prepare base and forms. Place the mix. Screed to level. Bull floats once. Wait for the bleed water to disappear. Finish at the right moment. Cut control joints early. Cure for several days.
Many light duty patios and paths use a common residential thickness. Heavier loads and poor soils need more. Follow your local standards and soil needs for pouring concrete slab work.
Concrete gains strength over several weeks. Protect it properly during the first seven days. Avoid applying heavy loads until it reaches the specified strength.
Do not finish while the surface is shiny with bleed water. Wait for the sheen to fade, then broom or trowel. Begin curing as soon as finishing allows, and protect the slab from cold, wind, and early traffic.