

Concrete Slab Installation: Costs, Steps & Essential Requirements
You might be planning a new patio, a garden room, a home office or even a small shop. At some point you realise that everything you want to build will sit on one thing: a concrete slab. If that slab goes wrong, doors stick, floors crack and money feels wasted. If it goes right, you forget about it for years. This guide keeps concrete slab installation simple so you can make decisions with a clear head instead of guessing.’
Maybe you have already searched How to Build a Concrete Slab and ended up more confused than before. Some people say you can do it in a weekend. Others insist you must always hire a professional. The truth sits in the middle. With the right information you can choose where to save, where to invest, and when to bring in a concrete contractor instead of trying to handle everything alone.
We will walk through concrete slab cost, the main steps from bare soil to finished surface and the essential details that protect your money over the long term. By the end you will understand what a good installer does and which questions to ask before anyone brings a truck on site.
A concrete slab is a flat layer of concrete placed on prepared ground. People use it for patios, garages, sheds, driveways, workshops, and light commercial spaces. It spreads the load of whatever sits on top so the ground can support it.
What Is a Concrete Slab and How Does It Work
Most slabs have three basic layers. First is the prepared soil or subgrade. Next is a base of compacted gravel or crushed stone. On top of that sits the concrete, sometimes with steel mesh or rebar inside. When each layer is done well, the slab performs for a long time with very little drama.
Quick look at concrete slab cost
Before you compare quotes,, it helps to know what affects the price. The cost of a concrete slab usually changes based on a few simple factors that any homeowner can understand.
Size. Bigger slabs use more material and more labour. A pad for a small shed will cost less than a floor for a large garage.
Thickness. A four inch slab may suit light loads. Heavier vehicles or machinery often need thicker concrete, which raises the cost to pour concrete slab.
Site access. If a truck can back right up to the forms, work goes faster. If workers must move concrete in wheelbarrows or pumps, the bill rises.
Base and reinforcement. A gravel base, plastic sheeting and steel reinforcement help prevent future issues like sinking or wide cracks, but they do increase the short term cost of a concrete slab.
Finish. A simple broom finish is usually the most affordable. Decorative textures, colored mixes, or a surface that will later become a polished floor will cost more.
When you look at quotes, do not only focus on the final number. Ask what thickness, base, and finish that number includes. Once you understand these items, concrete slab cost starts to make sense.
Essential requirements before anyone pours concrete
Most slab failures have the same root cause. Someone rushed the early stages. Before any concrete arrives you need a few basics in place.
Check rules and services
First, check local building rules. Some areas need permits for structural slabs, even for sheds or small home offices. Also call utility services so buried power, gas and water lines are marked. Digging without this check can be dangerous.
Plan the layout and levels
Decide the exact size and position of the slab. Think about doors, steps, drainage and how people will move around the finished space. Mark the outline with string or paint. For outdoor areas the slab should slope slightly away from the building so water does not sit against walls.
Prepare and compact the ground
Strip away grass, roots and soft topsoil. Dig down enough to allow for the base stone and the slab thickness. The soil under the base must be firm. If it feels spongy under your feet, compact it with a plate compactor or hand tamper until it feels solid.
Create a strong base
Most projects need a layer of compacted gravel under the concrete. This base spreads loads, helps drainage and reduces movement over time. Spread the stone in thin layers and compact each one. Taking time here pays off because the concrete can only be as stable as what sits under it.
Control ground moisture
For interior spaces or slabs that will receive wood, vinyl or other sensitive finishes, use a plastic sheet as a vapour barrier under the concrete. Lay it flat, overlap the seams and tape them so moisture from the soil cannot easily rise into the slab.
Plan reinforcement and joints
Decide whether you will use steel mesh or rebar. Reinforcement helps the slab carry weight and keeps cracks tighter if they appear. Also plan control joints, which are straight cuts or formed grooves that tell the concrete where to crack in a neat line instead of a random pattern.
Read More: Concrete Calculator Guide: Save Time, Money, and Avoid Wastage
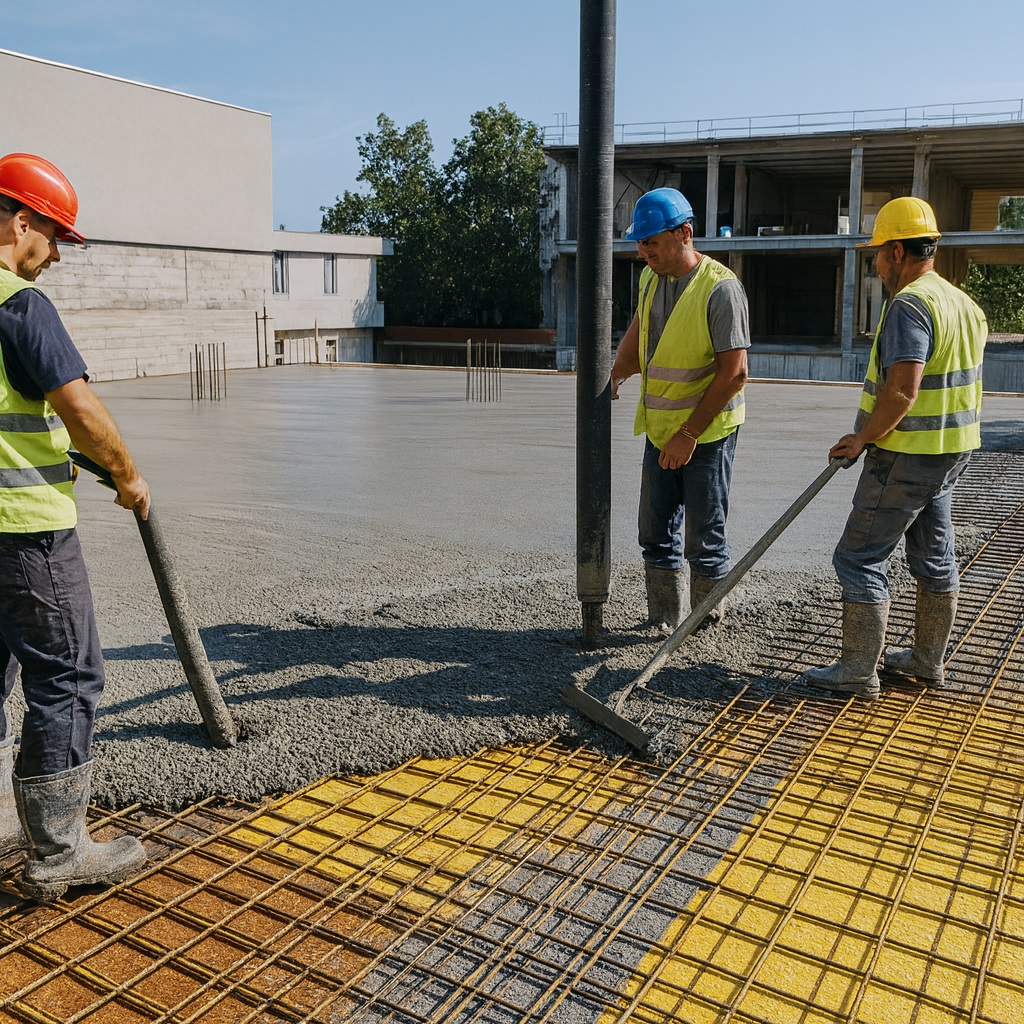
Step by step overview of the installation process
The exact method varies a little between projects, but most residential and small commercial jobs follow the same simple sequence.
Mark and measure. Workers mark out the slab area and double check corners and dimensions.
Excavate and compact. They dig to the required depth and compact the soil so it is firm.
Add and compact the base. Gravel goes in, is spread to an even thickness and compacted.
Install vapor barrier. For interior or moisture-sensitive spaces, plastic sheeting is laid on the base.
Build and brace forms. Straight boards are fixed around the edges at the final slab height and braced so they will not move.
Place reinforcement. Mesh or rebar is placed on small supports so it sits in the middle of the slab, not on the soil.
Pour and level. Concrete is placed into the forms, moved into corners and levelled with a straight piece of timber.
Float and finish. The surface is smoothed with floats, then given a final texture such as a light broom finish for grip.
Edge and cut joints. Edges are tidied, and control joints are cut or formed at set spacings.
Cure. The slab is kept damp or otherwise protected so it can gain strength over the next several days.
This is the core of concrete slab installation. Each step is simple on its own. Problems usually appear when people rush or skip one of them.
Concrete decks and deck blocks
Many residences now feature outdoor living spaces. A concrete patio provides a flat, sturdy surface for seating, barbecues, or even hot tubs. Since it is outdoors, proper drainage and surface traction are essential. A gentle slope away from the house ensures water drainage, while a light broom finish enhances grip, even when wet. If you’re considering an outdoor kitchen or a heavy spa, consult a concrete contractor regarding weight considerations before constructing the slab.
In some situations you may not need a full slab at all. For a light shed or small timber platform, concrete deck blocks can work well. These precast units sit on compacted soil and support posts or beams. They reduce digging and curing time. However, concrete deck blocks are not ideal for very heavy structures, steep ground or areas with strict building rules. Always check local guidance before you choose them instead of a continuous slab.
When to hire a concrete contractor
Small jobs, such as a small pad for bins or a compact air conditioning unit, can be realistic DIY projects if you are organised and willing to learn. For larger slabs, the concrete sets quickly, the loads are higher and mistakes become expensive. That is when a skilled concrete contractor truly earns their fee.
A good contractor will survey the site, check levels and soil conditions, choose the right mix and reinforcement, and organise enough workers for the pour. They understand how heat, cold and wind affect fresh concrete. They also know how to plan joints, drainage and curing so the slab performs well in daily use.
If your project needs to support vehicles, heavy machines or structural walls, paying for experienced help is usually a smart choice. Ask for written quotes that show thickness, base, reinforcement, finish and curing method. This helps you compare more than just the final price.
Working with a commercial concrete contractor
Larger projects, such as workshops, warehouses, and retail units, have stricter standards than typical patios or sheds. Floors may need to support forklifts, pallet racking, or constant trolley traffic, making flatness and level far more critical. A commercial concrete contractor handles these requirements daily and brings that expertise to both design and execution.
When planning a business space, an experienced professional can advise on slab thickness, joint layout, load paths, and movement joints. They also coordinate with plumbers, electricians, and fit-out teams to ensure that cuts and penetrations do not weaken key areas of the slab.
If you want the structural slab to serve as the final walking surface, you may later hire a commercial polished concrete specialist. This expert grinds and polishes the hardened surface to create a smooth, attractive, and low-maintenance floor. In such cases, involving the polished concrete contractor early helps ensure the concrete mix, reinforcement, and joint layout support a high-quality finish.
Cost to pour a concrete slab versus long term value
It is normal to focus on the invoice when you read the first quote. Yet the real cost to pour concrete slab includes how it behaves over many years. A thin slab on soft soil may look fine on day one and still cause trouble later. Doors can jam, tiles crack and vehicles may rock as they cross low spots.
Instead of asking only for the lowest price, ask how the design protects you over time. Solid ground, a compacted base, enough thickness, proper reinforcement and good curing all support strength and stability. Many articles that promise to explain How to Build a Concrete Slab skip these basics and talk only about mixing and pouring. When you talk with an installer, listen for clear answers about soil, base, drainage and curing. Those answers show they care about performance, not only speed.
Different slabs for different uses
Not every slab has the same job. You might need a surface for a garden shed, a clean floor for a workshop, a parking pad or a base for a small office.
Light duty slabs for sheds and small patios can often be thinner with simple reinforcement and a basic finish. Garage floors and driveways usually need more thickness and stronger reinforcement, especially in spots where vehicles turn or stop. Industrial or retail floors must handle repeated loads from trolleys, pallet jacks and cleaning machines. For those, the design and execution standards are higher and the margin for error is smaller.
Understanding these differences helps you match design to use. It also gives you better questions to ask any contractor or engineer who works on your project.
Curing, sealing and looking after your slab
Concrete gains strength as it cures. The first week matters most. If the surface dries out too fast, it can weaken and crack more easily. Simple steps such as keeping the slab damp, covering it with curing blankets or using a suitable curing compound can help. Avoid driving or placing heavy loads on fresh concrete until your installer says it has reached the required strength.
Sealing is essential for safeguarding surfaces from stains, moisture, and deterioration, particularly on driveways, outdoor slabs, and polished interior floors. It is crucial to adhere to the manufacturer’s instructions and to reapply the sealant as necessary. Routine maintenance is straightforward: regularly sweep away debris, promptly address spills, and ensure that gutters, downpipes, and the surrounding soil are well-maintained to prevent water accumulation against the slab.
Common mistakes to avoid
- Many concrete problems that appear months or years later start with simple mistakes made on the first day. Here are common errors and how to avoid them.
- Pouring on soft or poorly prepared soil leads to settlement and cracking. Always compact the subgrade before you build.
- Skipping the gravel base in wet climates lets water collect under the slab. Use a proper base unless a qualified professional says it is not needed.
- Forgetting to add slope on outdoor slabs causes puddles and slippery spots. Plan a gentle slope away from buildings.
- Cutting control joints too late leads to random cracks. Joints should be cut while the concrete is still young enough to respond.
- Ignoring curing leaves the surface weak and dusty. Follow the curing period, even if youare eager to start using the slab.
FAQs
A 20x20 slab is 400 square feet, so total price depends on cost per square foot, thickness and finish. Ask for a written quote that clearly lists what is included.
Concrete slab installation costs change with size, thickness, base, access, and local labour. The best way to know is to get two or three detailed quotes for your exact project.
You need firm compacted soil, a compacted gravel base, strong form boards and, for many indoor slabs, a plastic vapour barrier. Reinforcement such as mesh or rebar should sit inside the slab, not on the soil.
Installers prepare and compact the ground, add the gravel base, set forms and reinforcement, then pour and level the concrete. After that they finish the surface, cut control joints and let the slab cure.